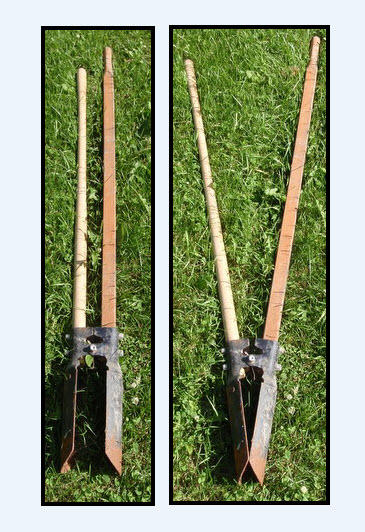
Now that you know you need one, how do you use a post hole digger the easy way?
Fortunately, using a post hole digger isn’t complicated. And if you don’t have one, you can usually buy or rent one from a local hardware store for $30 to $150.
Before you get started, it’s important to note that using a post hole digger can be physically demanding – even for the athletic, strong, and fit folks! Make sure to take breaks and work at a comfortable pace. It’s also a good idea to wear gloves, because the handles WILL give you blisters (ask us how we know!). Oh, and consider wearing safety glasses while using a post hole digger. It’s amazing how far those little rocks can fly.
Now that the safety warnings are out of the way, let’s talk about preparation.
- Obviously you need to determine the location where you need to dig the hole. You can mark it using a stake, large-ish rock, or spray paint.
- Pro tip: If you live in an area where the earth is dry, consider soaking the soil first. Moist soil will usually be much easier to dig through than dry soil.
- Assemble the post hole digger by attaching the handles to the digging head. Make sure the handles are secure and tightened properly!
Here’s how to use a post hole digger the easy way:
- Stand the post hole digger up so that the two handles are at your sides.
- Place the digging head of the post hole digger directly above the marked spot on the ground.
- Hold both handles up and push the blades of the digging head into the ground. It’s like digging with a shovel, sort of, except the blades should be perpendicular to the ground and not at an angle.
- Use your feet to step on the crossbar located at the bottom of the handles to drive the blades deeper into the soil.
- With the blades in the soil, spread the handles apart. This will cause the blades to come together at the bottom. If it won’t budge, try rocking the handles back and forth to loosen the soil, breaking up any clumps of soil and roots in the hole. Keep wiggling it around until you can pull out soil.
- In this position, lift the post-hole digger out of the hole to remove the dirt between the blades.
- Repeat this process until you reach the desired depth.
Once you have dug the hole(s) to the desired depth, it might be necessary to use a standard shovel to remove any excess soil from the hole. Whether you use a concrete mix in the hole or bury the pole directly is usually up to you (or your building codes). Either way, please use a level to make sure it is standing straight up. Then make sure to or cover the dried concrete with dirt or back-fill the hole with the soil you removed and tamper it down HARD to pack the soil around the post.
Be sure to check out our Blog for other helpful land owner tips!


